wxPython wx.Timerを使ってグラフィック描画してみる
wx.Timerを使ってカウントアップタイマーを表示し、カウントアップに応じてグラフィックの棒グラフを描画してみる。どこかに埋もれて無くなってしまう前にメモしておく。
参考にしたリンク
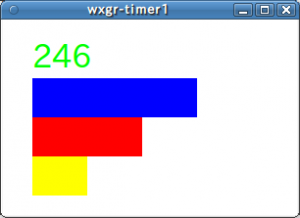
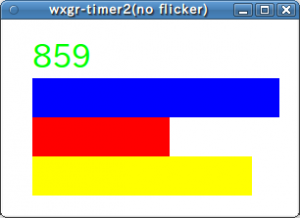
ウィンドウに、1から999までのカウントアップ値を表示させ、カウントの値に応じて1,10,100の位の棒グラフを描画する。最初はwx.ClientDCを使って描画し、次にwx.BufferedDCを使って、フリッカーノイズを対策してみる。
#!/usr/bin/env python
#coding:utf-8

import wx

class MyWindow(wx.Frame):
    def __init__(self, parent=None, id=-1, title=None):
        wx.Frame.__init__(self, parent, id, title)
        self.panel = wx.Panel(self, size=(300, 200))
        self.panel.SetBackgroundColour('WHITE')
        self.timer = wx.Timer(self)
        self.Bind(wx.EVT_TIMER, self.OnTimer)
        self.Fit()
        self.counter = 0
        self.timer.Start(50)

    def OnTimer(self, event):
        self.counter += 1
        if self.counter == 999:
            self.timer.Stop()
        pos_x = 30
        pos_cnt_y = 20
        g_height = 40
        g_width  = 28
        pos_g1_y = pos_cnt_y + g_height
        pos_g2_y = pos_g1_y + g_height
        pos_g3_y = pos_g2_y + g_height
        cnt_str = "%03d" % self.counter
        g_width1 = int(cnt_str[2]) * g_width
        g_width2 = int(cnt_str[1]) * g_width
        g_width3 = int(cnt_str[0]) * g_width
        dc = wx.ClientDC(self.panel)
        dc.Clear()
        dc.SetTextForeground('green')
        font = wx.Font(24, wx.FONTFAMILY_DEFAULT, wx.FONTSTYLE_NORMAL, wx.FONTWEIGHT_NORMAL)
        dc.SetFont(font)
        dc.DrawText(cnt_str, pos_x, pos_cnt_y)
        dc.SetPen(wx.Pen('blue'))
        dc.SetBrush(wx.Brush('blue'))
        dc.DrawRectangle(pos_x, pos_g1_y, g_width1, g_height)
        dc.SetPen(wx.Pen('red'))
        dc.SetBrush(wx.Brush('red'))
        dc.DrawRectangle(pos_x, pos_g2_y, g_width2, g_height)
        dc.SetPen(wx.Pen('yellow'))
        dc.SetBrush(wx.Brush('yellow'))
        dc.DrawRectangle(pos_x, pos_g3_y, g_width3, g_height)

if __name__ == '__main__':
    app = wx.PySimpleApp()
    w = MyWindow(title='wxgr-timer1')
    w.Center()
    w.Show()
    app.MainLoop()
メモ
- テキストの色を変更するにはSetTextForegroundメソッドをコールする。
- テキストの文字サイズを変更するには、サイズを指定してwx.Fontでfontオブジェクトを作成し、デバイスコンテキストオブジェクトのSetFontメソッドをコールする。
- テキストを表示するにはDrawTextメソッドをコールする。
実行すると
フリッカーノイズ対策した描画
#!/usr/bin/env python
#coding:utf-8

import wx

class MyWindow(wx.Frame):
    def __init__(self, parent=None, id=-1, title=None):
        wx.Frame.__init__(self, parent, id, title)
        self.panel = wx.Panel(self, size=(300, 200))
        self.panel.SetBackgroundColour('WHITE')
        self.timer = wx.Timer(self)
        self.Bind(wx.EVT_TIMER, self.OnTimer)
        self.Fit()
        self.counter = 0
        self.timer.Start(50)

    def OnTimer(self, event):
        self.counter += 1
        if self.counter == 999:
            self.timer.Stop()
        pos_x = 30
        pos_cnt_y = 20
        g_height = 40
        g_width  = 28
        pos_g1_y = pos_cnt_y + g_height
        pos_g2_y = pos_g1_y + g_height
        pos_g3_y = pos_g2_y + g_height
        cnt_str = "%03d" % self.counter
        g_width1 = int(cnt_str[2]) * g_width
        g_width2 = int(cnt_str[1]) * g_width
        g_width3 = int(cnt_str[0]) * g_width
        cdc = wx.ClientDC(self.panel)
        bmp_w, bmp_h = self.panel.GetSize()
        bmp = wx.EmptyBitmap(bmp_w, bmp_h)
        bdc = wx.BufferedDC(cdc, bmp)
        bdc.Clear()
        bdc.SetTextForeground('green')
        font = wx.Font(24, wx.FONTFAMILY_DEFAULT, wx.FONTSTYLE_NORMAL, wx.FONTWEIGHT_NORMAL)
        bdc.SetFont(font)
        bdc.DrawText(cnt_str, pos_x, pos_cnt_y)
        bdc.SetPen(wx.Pen('blue'))
        bdc.SetBrush(wx.Brush('blue'))
        bdc.DrawRectangle(pos_x, pos_g1_y, g_width1, g_height)
        bdc.SetPen(wx.Pen('red'))
        bdc.SetBrush(wx.Brush('red'))
        bdc.DrawRectangle(pos_x, pos_g2_y, g_width2, g_height)
        bdc.SetPen(wx.Pen('yellow'))
        bdc.SetBrush(wx.Brush('yellow'))
        bdc.DrawRectangle(pos_x, pos_g3_y, g_width3, g_height)
        cdc.DrawBitmap(bmp,0,0)

if __name__ == '__main__':
    app = wx.PySimpleApp()
    w = MyWindow(title='wxgr-timer2(no flicker)')
    w.Center()
    w.Show()
    app.MainLoop()
メモ
- フリッカーノイズを発生させないためにwx.BufferedDCを使う
- まず、wx.ClientDCオブジェクトを作成する。
- 次に、wx.EmptyBitmapでビットマップバッファーを作成し、これを指定したwx.BufferedDCオブジェクトを作成する。
- wx.BufferedDCオブジェクトに対してグラフィックを描画する。
- ClientDCオブジェクトのDrawBitmapメソッドをコールして、描画済みのビットマップを表示させる。いちいち描画しないのでフリッカーノイズは発生しない。


